What is a Pharmaceutical Equipment Validation Protocol and why is it critical in the pharmaceutical industry?
By: Gerry Creaner B.Chem Eng and Donagh Fitzgerald B.Prod Eng. Last Updated: January 2025

Photo: Medical Xpress
What is a Pharmaceutical Equipment Validation (IQ OQ PQ) Protocol?
An Equipment Validation Protocol is a written plan stating how equipment validation will be conducted. It details factors such as product characteristics, component-level impact assessment, production equipment, test scripts and methods, test parameters and acceptance criteria, test checksheets. and final approval.
BTW, if you need to learn how to populate one, check out our Equipment Validation Training Course.
What is the Aim of an Equipment Validation Protocol?
The main goal of a validation protocol is to define the test scripts required to ensure that equipment is fit for purpose—capable of manufacturing safe medicines at an affordable cost.
The protocol outlines all the equipment that you’d test including piping and instruments that are connected to the equipment. It also documents how the tests are going to be carried out, who is going to do them, and records whether the equipment. piping and instruments pass or fail.
We are going to do a deep dive into what’s contained within a validation protocol template. We’ll also take the example of validating a clean-in-place-system (CIP) within a pharmaceutical plant using the relevant supporting documents, to demonstrate how you’d complete the template.
But before we start, I’d strongly recommend you carefully read the following two articles to give yourself an overview of the validation process and familiarise yourself with some of the relevant terminology.
- What is Pharmaceutical Validation?
- What are IQ OQ and PQ and why are they critical to the pharmaceutical manufacturing industry?
How Do You Write an Equipment Validation Protocol?
Most validation projects will take an existing blank template and modify it for the project at hand rather than create a new blank template from scratch every time. But there may be times where you’d need to create key pieces of the protocol from scratch.
The protocol will detail the following elements.
- Product characteristics – showing what your system is looking to achieve/produce
- Production equipment – detailing the equipment necessary
- Test scripts and methods – telling you the steps involved in conducting a test
- Test parameters and acceptance criteria – defining acceptable test results
- Test checksheets – documenting and recording the test results
- Final approval – documenting that the validation process has been successfully carried out
Each critical system has its own protocol.
The objective is to create documented evidence to prove “fitness for use ” of an equipment system. It makes sure that a facility and the equipment in it, function as required so that it can be approved by the regulatory agencies that have jurisdiction over that facility.
It’s worth keeping in mind that the protocol is laid out for the convenience of those who follow, not for those who are initially filling it in. Sections are laid out to walk someone through the completed validated system, not in the order you’d fill them in.
This flowchart provides a broad overview of the process used to gain approval to execute the protocol and shows the expected time and responsibilities for developing it.

Image: Equipment Qualification in the Pharmaceutical Industry by Steven Ostrove
Not every protocol needs to follow this specific path or the indicated timeline (often depending on whether the protocol is prepared in-house or by an outside firm) but there are some general approaches and steps that have proven successful over the years that you’re likely to see included.
Steps in the Qualitifcation Process
It can be useful to think of a qualification protocol as a highly detailed checklist with 2 steps.
Step 1: Write and develop the protocol
This is a detailed document and contains the elements outlined above. This step is usually performed by a senior validation engineer, CQV or C&Q specialist and requires a lot of experience and detailed knowledge of the process.
Pre-preparation checklist
1) Perform a systems-level impact assessment to make sure you are only qualifying systems that have a direct or indirect impact on product quality and patient safety.
2) Get a thorough understanding of the unit’s function. You must understand the unit’s function and its intended use. If a unit has multiple functions, only those being utilized for the current operation need to be qualified. This includes ensuring that unqualified functions do not interfere with the operation of the qualified ones.
3) Inquire from the users (if possible) about the system’s expected specific function.
4) Gather necessary documents such as equipment manuals, URS, functional specifications, design specifications, and standard operating procedures (SOPs).
Documents needed for IQ OQ PQ preparation

5) Review the Process Flow Diagram (PFD) to grasp the overall process flow.
6) Review the Piping and Instrumentation Diagram (P&ID) to confirm the system boundaries. Each qualification protocol must represent a stand-alone system capable of operating independently. An example of such a system is a Clean In Place System, which, despite having many internal components crucial for its operation, presents itself as a complete unit. Below is an example of the boundaries drawn in yellow around a Clean-In-Place system.

7) Review the commissioning process for the unit to see if any component or design changes have been made.
8) Review the Factory Acceptance Tests (FAT), Site Acceptance Tests (SAT), and commissioning tests conducted, along with the history of the process (e.g., similar products manufactured using comparable equipment).
9) Determine if other machines of a similar type are in use to see if that knowledge can be used in the development of the protocol.
10) Inquire if there are any existing protocols or products similar to the one to be manufactured in the unit, which currently utilize similar equipment.
11) Thoroughly review current regulatory guidelines and current warning letters. Understanding the FDA or other regulatory agencies’ expectations is essential for crafting a clear and concise protocol.
Preparing the Protocol
- Only qualify critical systems and critical components: Perform a component impact assessment to develop a critical components list and only qualify those critical systems and those components within the system that are essential for the unit’s operation or have direct impact or contact with the product. Non-essential elements, such as lightning or steam supply, etc do not require qualification.
- Prepare protocol: Prepare the protocol with predetermined acceptance criteria. You need to have a planned approach to qualification, ensuring that all testing aligns with user requirements specifications (URS) rather than design specifications alone.
- Format: Protocols need to have a specific defined structure or format. However, this format is not as important as its content. Once a format has been established for a company or consultancy, try to maintain this format for future protocols.
Step 2: Execute an IQ OQ or PQ protocol
This is where you take the documents (paper or electronic) out on-site and execute each of the IQ OQ or PQ protocols. You’ll be leaving your desk and going out onto the factory floor with the checklist in hand. You’ll then use it to test and confirm everything is correctly installed, properly configured, and works as intended under load.
Pre-execution checklist
- Review the protocol and confirm what is to be tested and how it is to be performed.
- Make sure you have the current (correct) version of the protocols that are to be executed and review them before starting the execution.
- Check that the protocols have been fully approved (by QA, Engineering, Maintenance, Calibration, etc) before starting the execution paying attention to the operational parameters and environmental conditions.
- Check that the equipment is ready and available for the current protocol execution (e.g. it may have been approved for use in or for another product or situation).
- Review safety procedures.
- Notify owners of scheduled validation work.
- Collect necessary test instruments, check they’re all calibrated and that their calibration certificates are available for attachment to the protocol.
- Notify any specialists you need to assist with testing (e.g. operators, electricians, fitters).
- Obtain relevant SOPs.
- Make a COPY of the protocol(s) to be executed and ensure that all pages are accounted for.
Completing the execution
- Do not make assumptions.
- Make sure that all piping is clearly identified and tagged.
- Make sure that utility connections are correct and tagged.
- All data/entries should be made on the protocol page. Additional pages may be added if necessary, with a unique number.
- All entries should be neat and legible to others.
- Don’t leave any blank lines or spaces.
- Make sure to follow Good Documentation Practices.
- The IQ protocol must be signed before the OQ can be signed.
- The OQ protocol must be signed before the PQ can be signed.
- All deviations must be closed before signing any protocol as complete.
- All data are entered and either initialled or signed and dated at the point of execution. -No pre or post-dating is allowed.
Always Remember!
- Equipment Validation and Equipment Qualification are often used interchangeably. However, some industry professionals argue that ‘Equipment Qualification’ is more precise, as you ‘Qualify’ equipment, piping, instruments, and utilities. In contrast, ‘Validation’ is typically reserved for processes, procedures, and methods. For the purposes of this guide, we will use both terms.”
- The goal is to make safe medicines at an affordable cost – you must balance these objectives. There can be a tendency, especially amongst novice C&Q technicians and engineers to qualify all components in a system. However, the qualification process is enormously time-consuming and expensive so this approach drives up the cost of qualifying and validating the project and subsequently the final price of medicine way higher than necessary (which makes it unaffordable to less well-off patients). The solution is to use system impact assessments, component impact assessments and risk management tools in a scientifically robust manner to support your decisions about what to validate to avoid over-qualifying.
- Use commissioning data wherever possible to reduce testing duplication. The quality assurance department will need to approve.
- There is no single right answer or a “perfect” approach to validating a project. In fact, there are always multiple right answers and approaches. The key point is that you must be able to explain your rationale to an FDA or EMA auditor or supervisor. As long as your rationale is sound and logical so that even if someone disagrees with you, they can understand the decision, you won’t be penalised (even if you are asked to change it).
Equipment Validation Protocol Format
- Approvals Page
- System Description
- Scope
- P&ID Scope
- Definitions / Glossary
- Responsibilities / Subject Matter Experts
- Calibration Program Verification
- Preventative Maintenance Program Verification
- Draft SOP (Standard Operating Procedure) Verification
- Test-Instrument Calibration Verification
- Progression Approval to Proceed to Functional Verification
- Operational Critical Instrument Calibration Verification Form
- Functional Verification Testing Procedure
- Approved SOP Verification
- Protocol Quality Procedures
- P&ID Walkdown Installation Verification
- Equipment Installation Verification
- Instrument Installation Verification
- Piping Installation Verification
- Traceability Matrix
1 – Approvals Page

On the protocol approvals page, you would complete a list of necessary protocol approvers – the people who need to “sign off” on the validation activities.
How this would “look” in the real world:
This section is where validation team members have their responsibilities summarised, and sign to state that everything they’ve written in the document is correct and accurate. Each of the relevant personnel would be listed on this page.
While this is the first page of a protocol, it is the last page that will be signed. Signatures on this page confirm that everything in the rest of the document is accurate and that you are happy with the results and recommendations.
You should never sign anything unless you know it to be an accurate reflection of the situation. You would never sign anything that was not your own work. Always remember that in an FDA audit, the auditor could ask to speak to you about your specific role in the validation process, and you would have to be able to defend the decisions you made.
Additional Reading
What Types of Jobs are there in the Pharmaceutical Industry?
What Is a Validation Engineer?
2 – System Description

In this section, you need to prepare a summary ‘System Description’. You might include things such as:
- Drawing a process flow / block diagram
- Listing critical operational features
- Describing the major equipment components in the context of their installation and functional features.
How this would “look” in the real world:
In an FDA audit, this is where the auditors will go first to understand the system being validated. It provides a high-level overview of the equipment system. It needs to be short, but also provide the level of detail they need to understand the rest of the protocol.
When you first begin in a Validation team, this will probably already be completed for you. However, as you gain seniority, you will need to understand the purpose of a system description and be able to write one of your own.
3 – Scope
In our example, we have broken this into 3 parts.
System Impact Assessment:

In this section you describe why the CIP System is considered a ‘direct impact’ system.
Component Impact Assessment:

For the identified equipment, instruments, and piping, you must determine if the components are critical or non-critical – and if critical, whether they are product-contact critical, operationally critical, or both.
Let’s take a look at how you differentiate between by product-contact critical items, operationally critical items, and non-critical items
Product-contact critical items come into direct contact with the product OR are part of the chain of surfaces through which there is a risk of contamination being carried to the product.
The first part of that is quite self-explanatory but the second part can take a bit of thinking about. So let’s consider an everyday example…
You’re in the kitchen and you cut raw chicken. Once you’ve finished, you don’t wash your hands. Instead you go to the fridge and take out salad items. You cut them, and serve the salad to your friend. Your friend gets ill from salmonella after eating the salad.
Your friend was never near the raw chicken but there was a chain of surfaces (e.g. the skin on your hands, and the outer surface of the salad items) that brought the salmonella directly from the raw chicken to your friend.
Our clean in place system has that type of product-contact critical items. The final medicine or its ingredients never come near the clean in place system but the system is part of a chain of surfaces that can pass contamination to the product.
Think of the detergent tank of our system. The inner surface of the tank touches the detergent liquid. That detergent liquid passes along a system of pipes and into the reactors during a drawdown. That same liquid then touches the inner surface of the reactor. After a cleaning cycle is finished and manufacturing restarts, the inside of that reactor will come into direct contact with product ingredients.
So although no final products (or even ingredients) are ever in direct contact with the inside of the detergent tank, there is a chain of surfaces that leads from the tank to a surface that will come into contact with the product. If there was contamination in the detergent tank, there is a possibility it could ultimately reach the product via this chain of surfaces. Therefore, our detergent tank is product-contact critical.
Operationally critical items don’t come into direct contact with the product and they’re not part of that chain of surfaces that can introduce contamination. But they contribute to maintaining a state of balance (dynamic equilibrium) for the key factors (e.g. temperature, flow, level, concentration) in our Clean in Place system.
If any of these 4 key factors are out of specification in our CIP system (e.g. liquid is not hot enough or detergent concentration isn’t strong enough), we cannot guarantee that the system is working as intended. Operationally critical items are involved in controlling, monitoring, or reporting these 4 factors so it’s essential that we validate them.
(Note that these key factors may be different depending on the system you’re validating, the 4 listed are specific to controlling our CIP system.)
Non-critical items do not come into contact with the product, nor can they influence the factors that are essential for the correct functioning of the system.
Summary Table – Operational Critical Components:

For any component identified as operationally critical, you’ll then complete the summary table of the operational critical components and include rationale.
How this would “look” in the real world:
When you begin in the field – the component impact assessment will probably have been completed for you . However, over time, you are expected to be able to conduct an impact assessment on your own. This is one of the most critical parts of a protocol.
The examples above and your knowledge of ISPE Guide Baseline 5 will be key when it comes to making decisions about criticality, and what needs validation as a result.
It’s important to remember the remit of the FDA at this point and instil it in your work ethic – to ensure the “manufacture safe medicines” and “at an affordable cost”.
You should always keep in mind that the more items that need to be validated, the costlier the validation process will be, and the costlier the medicine will be for the patient. You need to validate the key items, but you cannot just validate everything “just incase”. It’s this balancing act you will need to perform in the field.
You have to be able to justify your decisions around which things you deemed critical if questioned by an FDA auditor.
Always remember, that while an FDA auditor might hold a different opinion on which items are critical, they will respect your decisions if you use scientific-based risk management tools to reach them. There can be different opinions as there is often no single right answer to what is critical and what is not. There are wrong answers of course, but many decisions on critical items are shades-of-grey rather than black or white.
4 – P&ID Scope

In this section you include a copy/scan of the P&ID and either draw a ‘scope bubble’ or yellow-highlight the ‘in-scope’ components.
How this would “look” in the real world:
This section builds on the decisions you made earlier. In the field, the decisions you made regarding the scope of the protocol (i.e. what equipment elements, instrumentation components, and line and piping elements are part of the system you are validating) determine what you include in the scope bubble here. Again, as a new member of a validation team, you will likely be told what is included but over time you will be expected to make the decisions yourself.
5 – Definitions / Glossary

Make a list of abbreviations that are used in the protocol and their definitions. This is something you should fill up as you complete the protocol. Once you have finished, read back through the protocol and make sure to add any abbreviations you have missed.
How this would “look” in the real world:
The purpose of this section is so that the person who comes along after you can understand any abbreviations you have used throughout the protocol. We all routinely use some abbreviations, this is no different in companies. But an abbreviation used on the factory floor that people around you understand is not necessarily something an outsider or someone new to the company will know. When it comes to an FDA auditor, they need to be able to understand exactly what you are referring to with your abbreviations – so make sure this is as comprehensive as possible.
6 – Responsibilities / Subject Matter Experts

In this section, you identify subject matter experts. These are the people responsible for the development, review, approval, and execution of the protocol. Complete a list of project responsibilities for each of the specific subject matter experts.
How this would “look” in the real world:
When you begin in a Validation Team, you will be told exactly who needs to sign off on your work and what responsibilities each team member has. If you go on to be a Validation Engineer and begin to write protocols from scratch, you could then be responsible for deciding what each department in the company is responsible for, who the subject matter experts are, and what responsibilities each person has.
An FDA auditor will turn to this protocol section to see each department or individual’s responsibilities so they know who to talk to if they have specific questions about a test or procedure. It is therefore important that this section is detailed and accurate.
This is also one of the sections that is closely linked to other protocol sections. Your Approvals Page (Section 2), Your Responsibilities Page (Section 10) and Your Progression Approval Page (Section 12), should all align. If they do not, an auditor is going to have serious questions.
7 – Calibration Program Verification

In this section, you need to give a summary of the ‘Calibration Program Verification’ procedure that is used to guide the creation of calibration check sheets (these are usually located in the protocol appendix). Make sure you write this from the perspective of someone who is entirely new to the system you are validating.
How this would “look” in the real world:
After you have identified the Operationally Critical Components (remember we did this in Section 3), you need to make sure that any operationally critical instruments you have identified become part of the maintenance team’s calibration rota.
Calibration is where you test to make sure the operationally critical instruments are working. For example, you would test to make sure that the temperature gauge is measuring the temperature correctly. This is done on a routine and ongoing basis to make sure everything is operating as intended for the whole length of the system life cycle. Commissioning, Qualification & Validation (CQV), Commissioning & Qualification (C&Q) Engineers and Maintenance personnel are responsible for calibration testing in a plant. It falls into “Continued Process Verification”, the purpose of which is to ensure that the previously validated system remains in a reliable and validated state.
Your job in the field would be to write this summary, then use the information from this to create a checksheet to be completed during calibration activities. Finally, the CQV Engineers and Maintenance Personnel would be told to add this list of instruments to their regular calibration schedule.
Additional Reading
8 – Preventative Maintenance Program Verification

In this section, you need to give a summary of a ‘Preventative Maintenance Program Verification’ procedure that is used to guide the creation of a check sheet (that is usually located in the protocol appendix). Make sure you write this from the perspective of someone who is entirely new to the system you are validating.
How this would “look” in the real world:
Each plant has a preventative maintenance program. Preventative maintenance is how you ensure that all the operationally critical components you have identified, are working properly at all times.
The preventative maintenance team performs maintenance checks on equipment before there is a problem – like changing the tires on your car before they become bald. On a car, your tires should be good for 25,000 miles, and therefore if you change them at 20,000 miles they should have enough thread to be safe to drive on. The preventative maintenance system identifies the critical items that need to be maintained, and the duration between each maintenance check.
CQV Engineers, C&Q Engineers and Maintenance Personnel are responsible for the preventative maintenance program and it is your job here to complete the form with what components they need to add to preventative maintenance rota
Preventative Maintenance is also part of the stage of Validation called Continued Process Verification. Failure to complete this stage of validation could result in compromised batches of unreliable quality medicine that are not safe for patients to use.
The activities of this stage focus on two key goals:
- To maintain equipment and facilities in their validated state
- To quickly highlight variation in product or process data, allowing corrective action to be taken
Activities involved in Continued Process Verification might include things such as:
- Regular equipment maintenance
- Routine testing of in-process materials and final product sampling (comparing both within and between batches)
- Routine gathering and analysis of in-process data
- Equipment swabbing
- Cleaning
Additional Reading
9 – Draft SOP (Standard Operating Procedure) Verification
-Verification-GetReskilled")
In this section, you’ll propose a list of necessary standard operating procedures for the ‘Clean in Place’ system.
The information you outline here will be used to create an SOP checksheet in the protocol appendix.
How this would “look” in the real world:
As you know by now, no matter what role you have in the Pharma or MedTech industries, a key part of your job will always involve following strict internal protocols and Standard Operating Procedures (SOPs) as well as following current Good Manufacturing Practices (cGMP).
When you start in a Validation Team, you are going to be told which SOPs are going to be implemented because of the validation protocol that has been written. As you go up the career ladder, you will be expected to make the decision regarding what SOPs are needed.
This section basically tells an auditor that at this stage of the protocol, you were thinking of implementing the following list of SOPs to make sure the equipment functions as intended. When you get to later sections, you are then going to tell an auditor (and your colleagues) the finalised list of SOPs that are to be followed.
Writing SOPs is an advanced-level task but it’s important that you understand where they come from and how they integrate with the rest of the protocol.
Additional Reading
10 – Test-Instrument Calibration Verification

In this section, suggest a list of test instruments that may be required for the testing phase.
The information you outline here will be used to create a test-instrument calibration verification checksheet in the protocol appendix.
How this would “look” in the real world:
This section is very simple. You want to document that all test instruments used to validate the readings on the instruments of the Clean in Place system are functioning correctly. We’ve already talked about the importance of calibration but in this case, in the future, if there was a problem with any of the instrument readings on the CIP system, you want to rule out the possibility that it was a problem that stemmed from a faulty test instrument reading
11 – Progression Approval to Proceed to Functional Verification

Align the signatories in this section “Progression Approval to Proceed” with the section 2 signatures on the ‘Approvals Page’, section 6 Responsibilities / Subject Matter Experts, and the protocol signature log which will be contained in the appendix.
How this would “look” in the real world:
This section is where you would sign your name stating that everything you have written is correct and accurate as you move into functional verification. You’ll see again that all relevant personnel have to sign at this stage, and responsibilities for each are summarised.
Remember, you should never sign anything unless you are sure it’s an accurate reflection of the situation – and you would never sign anything that was not your own work. In an FDA audit, where an auditor was looking at this specific piece of equipment, the auditor could ask to speak to you about your specific part validating the equipment, and you could have to justify decisions you made, to them.
This is a section that builds on what you have written previously. What is written here should match what you wrote in section 2 and 10. And again, an auditor would have questions for you if it didn’t.
12 – Operational Critical Instrument Calibration Verification Form

Enter the same list of instruments into the ‘Operational-Critical-Instrument Calibration Verification Form’ in this section as those listed in Section 3 ‘Summary Table – Operational Critical Components’.
How this would “look” in the real world:
The purpose of this form is to ensure that critical instruments associated with the system are in a calibrated state during the operational qualification (OQ) phase.
Operational Qualification is used to confirm that the overall CIP system will operate as intended
To carry this out, C&Q engineers must carry out various tests on the equipment to make sure the system functions is meeting the expectations outlined in the User Requirement Specification (URS) for flow, temperature etc.
13 – Functional Verification Testing Procedure
Prepare functional test procedures for Temperature, Flow and Level for the Clean in Place System.

The sections included in your test procedures should be:
a) Short Description of the test
b) Linkage to the requirements challenged (and operationally critical components)
c) Acceptance criteria for the test
d) Prerequisites and or assumptions
e) Specific Test steps
f) Expected results and actual results
Use those to prepare complimentary functional verification check sheets for Temperature, Flow and Level – as critical features of the Clean in Place System.

These check sheets will be located in the Appendix.
How this would “look” in the real world:
When you first begin in a Validation Team, you will be given the list of tests you have to perform, the steps involved in doing so, and what the acceptable range of results are. However, as you move up the career ladder, you will be expected to write these OQ tests and OQ GMP checksheets by yourself.
14 – Approved SOP Verification

In this section you list out the approved SOPs.
How this would “look” in the real world:
As you know by now, no matter what role you have in the Pharma or MedTech industries, a key part of your job will always involve following strict internal protocols and Standard Operating Procedures (SOPs) as well as following current Good Manufacturing Practices (cGMP).
When you start in a Validation Team, you are going to be told which SOPs are going to be implemented as a result of the validation protocol that has been written. As you move up the career ladder, you will be expected to make decisions regarding which SOPs you think are needed.
This section tells an auditor (and your colleagues) the finalised list of SOPs that are needed. This builds on the draft list you provided earlier.
Additional Reading:
15 – Protocol Quality Procedures
Signature log:

In this section you summarize a signature-log procedure. This will be used to create the log contained in the Appendix.
How this would “look” in the real world:
When you first begin working in a Validation Team, you will simply be asked to sign this Signature Log checksheet. As you gain seniority in the team, you will be asked to explain what is included in the checksheet and the procedure for defining who is eligible to sign off documents in the protocol
Every individual who has made an entry into the protocol needs to complete the Signature Log Checksheet. This Signature Log Checksheet summarises for an auditor who the key people were in validating this piece of equipment.
It also acts as a summary of their professional experience for an auditor, as well as providing a way of tracking who works on what projects. Remember, a Validation Team on a project such as an installation and verification validation protocol could be made up of both in-house staff and outside contractors. You need to know what company they work for, what their subject matter expertise is, whether they are GMP trained, whether they are adhering to their roles and responsibilities etc.
Deviation procedure:

In this section you summarize a protocol deviation procedure. This will be used to create the deviation form contained in the Appendix.
How this would “look” in the real world:
There will always be deviations. Initially your task will mostly just involve filling up deviation checksheets and giving them to your boss to resolve with the relevant Subject Matter Experts (SME’s).
As you move up the career ladder, and you begin writing protocols and test procedures of your own, your job will be to find these deviations, and resolve them in real-time with the relevant Subject Matter Experts.
An FDA auditor is not looking for the deviation section of the protocol to be blank, in fact that worries them a bit (as it could mean you did not complete a thorough investigation of the system). What an FDA auditor is looking for in the deviation checksheets is that when you found a problem, you followed procedure, contacted the relevant people and solved the problem as quickly as possible.
There are categories used to describe different deviations. The 5 categories are:
- Correction of formatting and typographical errors (protocol generation errors)
- Data entry errors during execution
- Repeating a test due to an identifiable technical error during execution
- Making a test criteria less stringent
- Deletion of a test
Change control procedure:

In this section you summarize a change control procedure. This will be used to create the change control form contained in the Appendix.
How this would “look” in the real world:
When you discover more serious deviations, you and your team may need to make a change to the detail drawings or the design to resolve the problem. This will lead to you having to follow the “Change Control Procedure”.
For example, if you have identified any category 3, 4, or 5 deviations, you will most likely have to complete a change control procedure form as well. Basically – you’ve identified a problem (e.g. you fail to get the expected results from a functional test), how do you suggest it is solved?
When you start in a Validation Team, your role will stop at completing the detailed deviation form. However, as you gain seniority, you will also be expected to be part of the change control process and maybe eventually even lead the change control committee (which is made up of Subject Matter Experts from across the relevant departments). So this is important to learn now.
There are 7 steps to the change control process:
- Describe the proposed change
- Document and justify the change
- Evaluate the risks and impact of the change
- Change control committee will accept or reject the request for change
- Develop and verify the change
- Approve and implement the change
- Close the change and make sure all documentation is in order.
16 – P&ID Walkdown Installation Verification and Validation Protocol GMP Checksheet
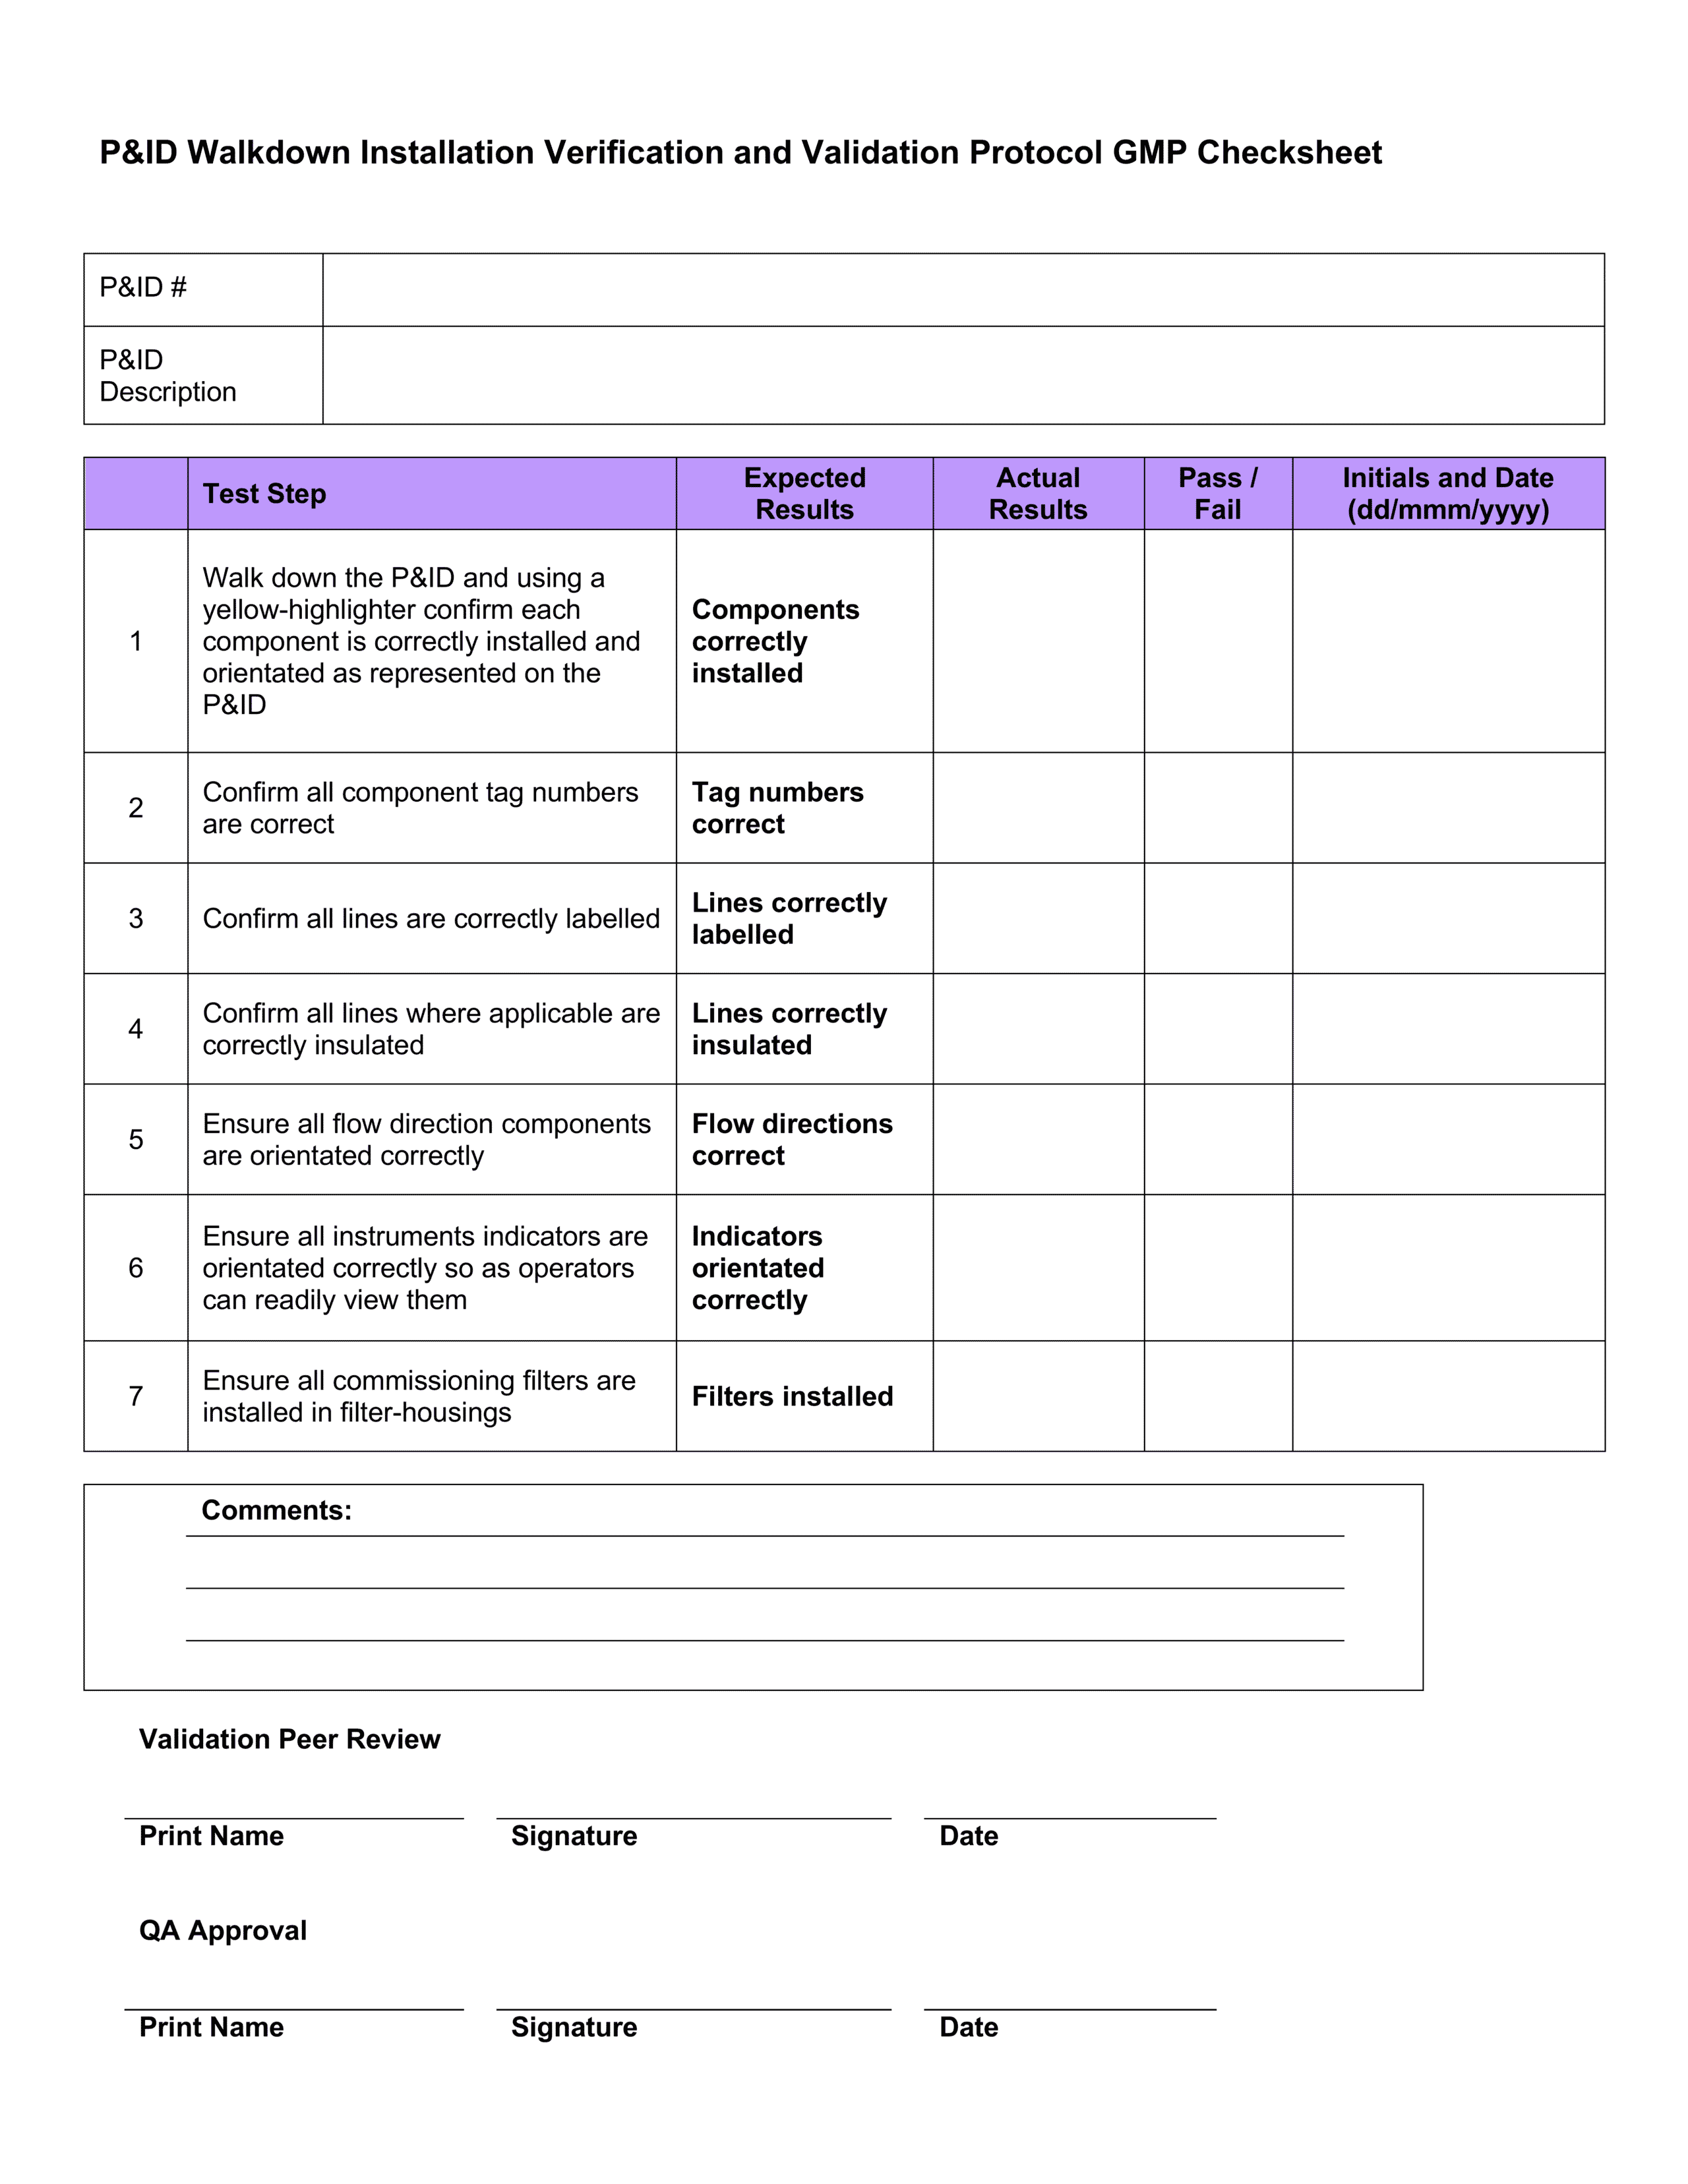
How this would “look” in the real world:
A key inspection of any piece of equipment is a visual inspection. This will probably be one of the first tasks you complete on a Validation Team.
You would be sent out onto the factory floor (sometimes in teams of two or more) and visually confirm that what has been installed matches what’s drawn on the P&ID.
You’d then check that each part of the system has been correctly labelled (i.e. if a pipe on the P&ID has been tagged “P-001”, the same pipe on the factory floor should have a label “P-001” written on it). This walkdown only looks at what is on the factory floor and compares it to what is in the P&ID.
Remember: There is an installation verification testing procedure in Section 13 which reminds you of
- Description of Test
- Linkage to Requirements Challenged
- Acceptance Criteria
- Prerequisites and/or Assumptions
- Test Method
- Expected Results and Actual Results
This testing procedure will already have been written by the lead Validation Engineer so when you start your career, your main job will be to read and understand what’s required, then carry out the tests according to the method described, and record the results in the appropriate checksheets.
17 – Equipment Installation Verification and Validation Protocol GMP Checksheet
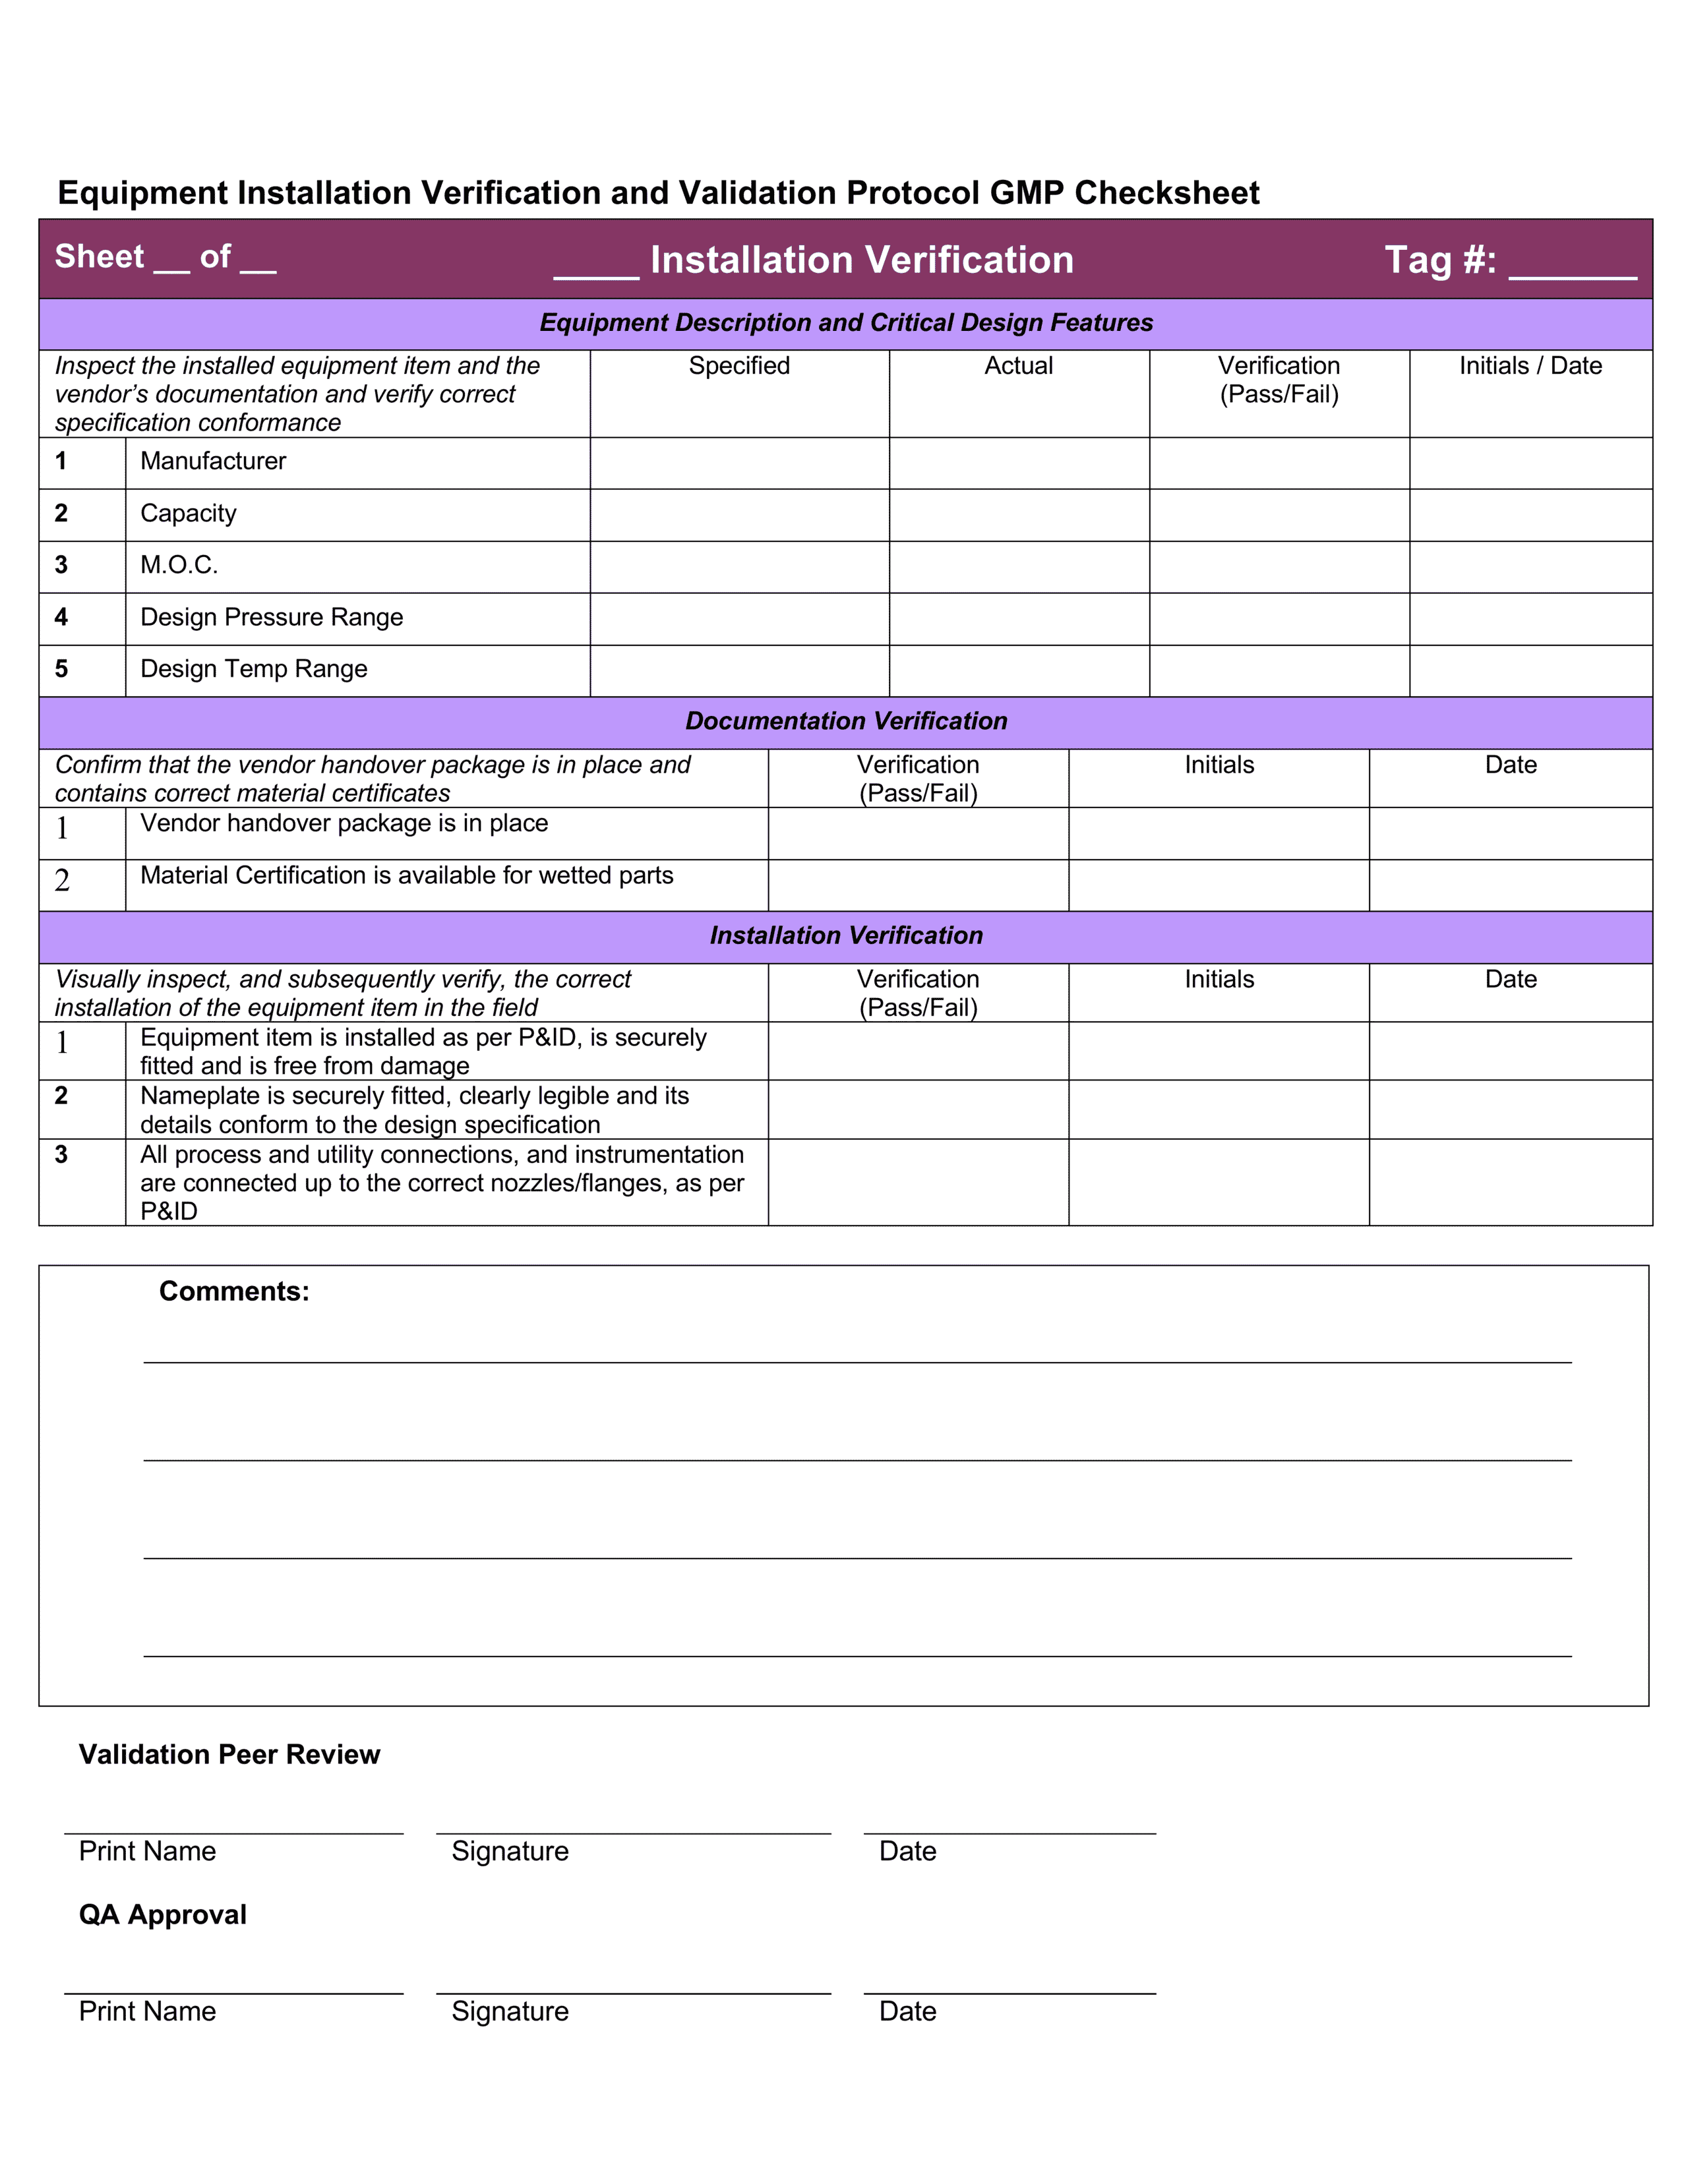
- Relate the Equipment List to the P&ID and the URS
- Prepare installation verification check sheets for the necessary equipment items by pre-populating details for Manufacturer, Capacity, M.O.C.,
- Design Pressure Range and Design Temp Range.
You would then go out and check the details of each piece of equipment in person
You should only be validating the equipment that you have decided is operationally critical components and so if the items you complete checksheets for, are not the items in your summary table, an FDA auditor is going to have questions.
How this would “look” in the real world:
This is one of the first jobs you will do after you join a Validation Team.
There is an installation verification testing procedure in Section 13 which reminds you of
- Description of Test
- Linkage to Requirements Challenged
- Acceptance Criteria
- Prerequisites and/or Assumptions
- Test Method
- Expected Results and Actual Results
This testing procedure will already have been written by the lead Validation Engineer so when you start your career, your main job will be to read and understand what has to be carried out, then carry out the tests according to the method described and record the results in the appropriate checksheets.
If you find any deviations, make sure to follow your company’s deviation procedure and complete the relevant checksheet for deviations.
18 – Instrumentation Installation Verification and Validation Protocol GMP Checksheet
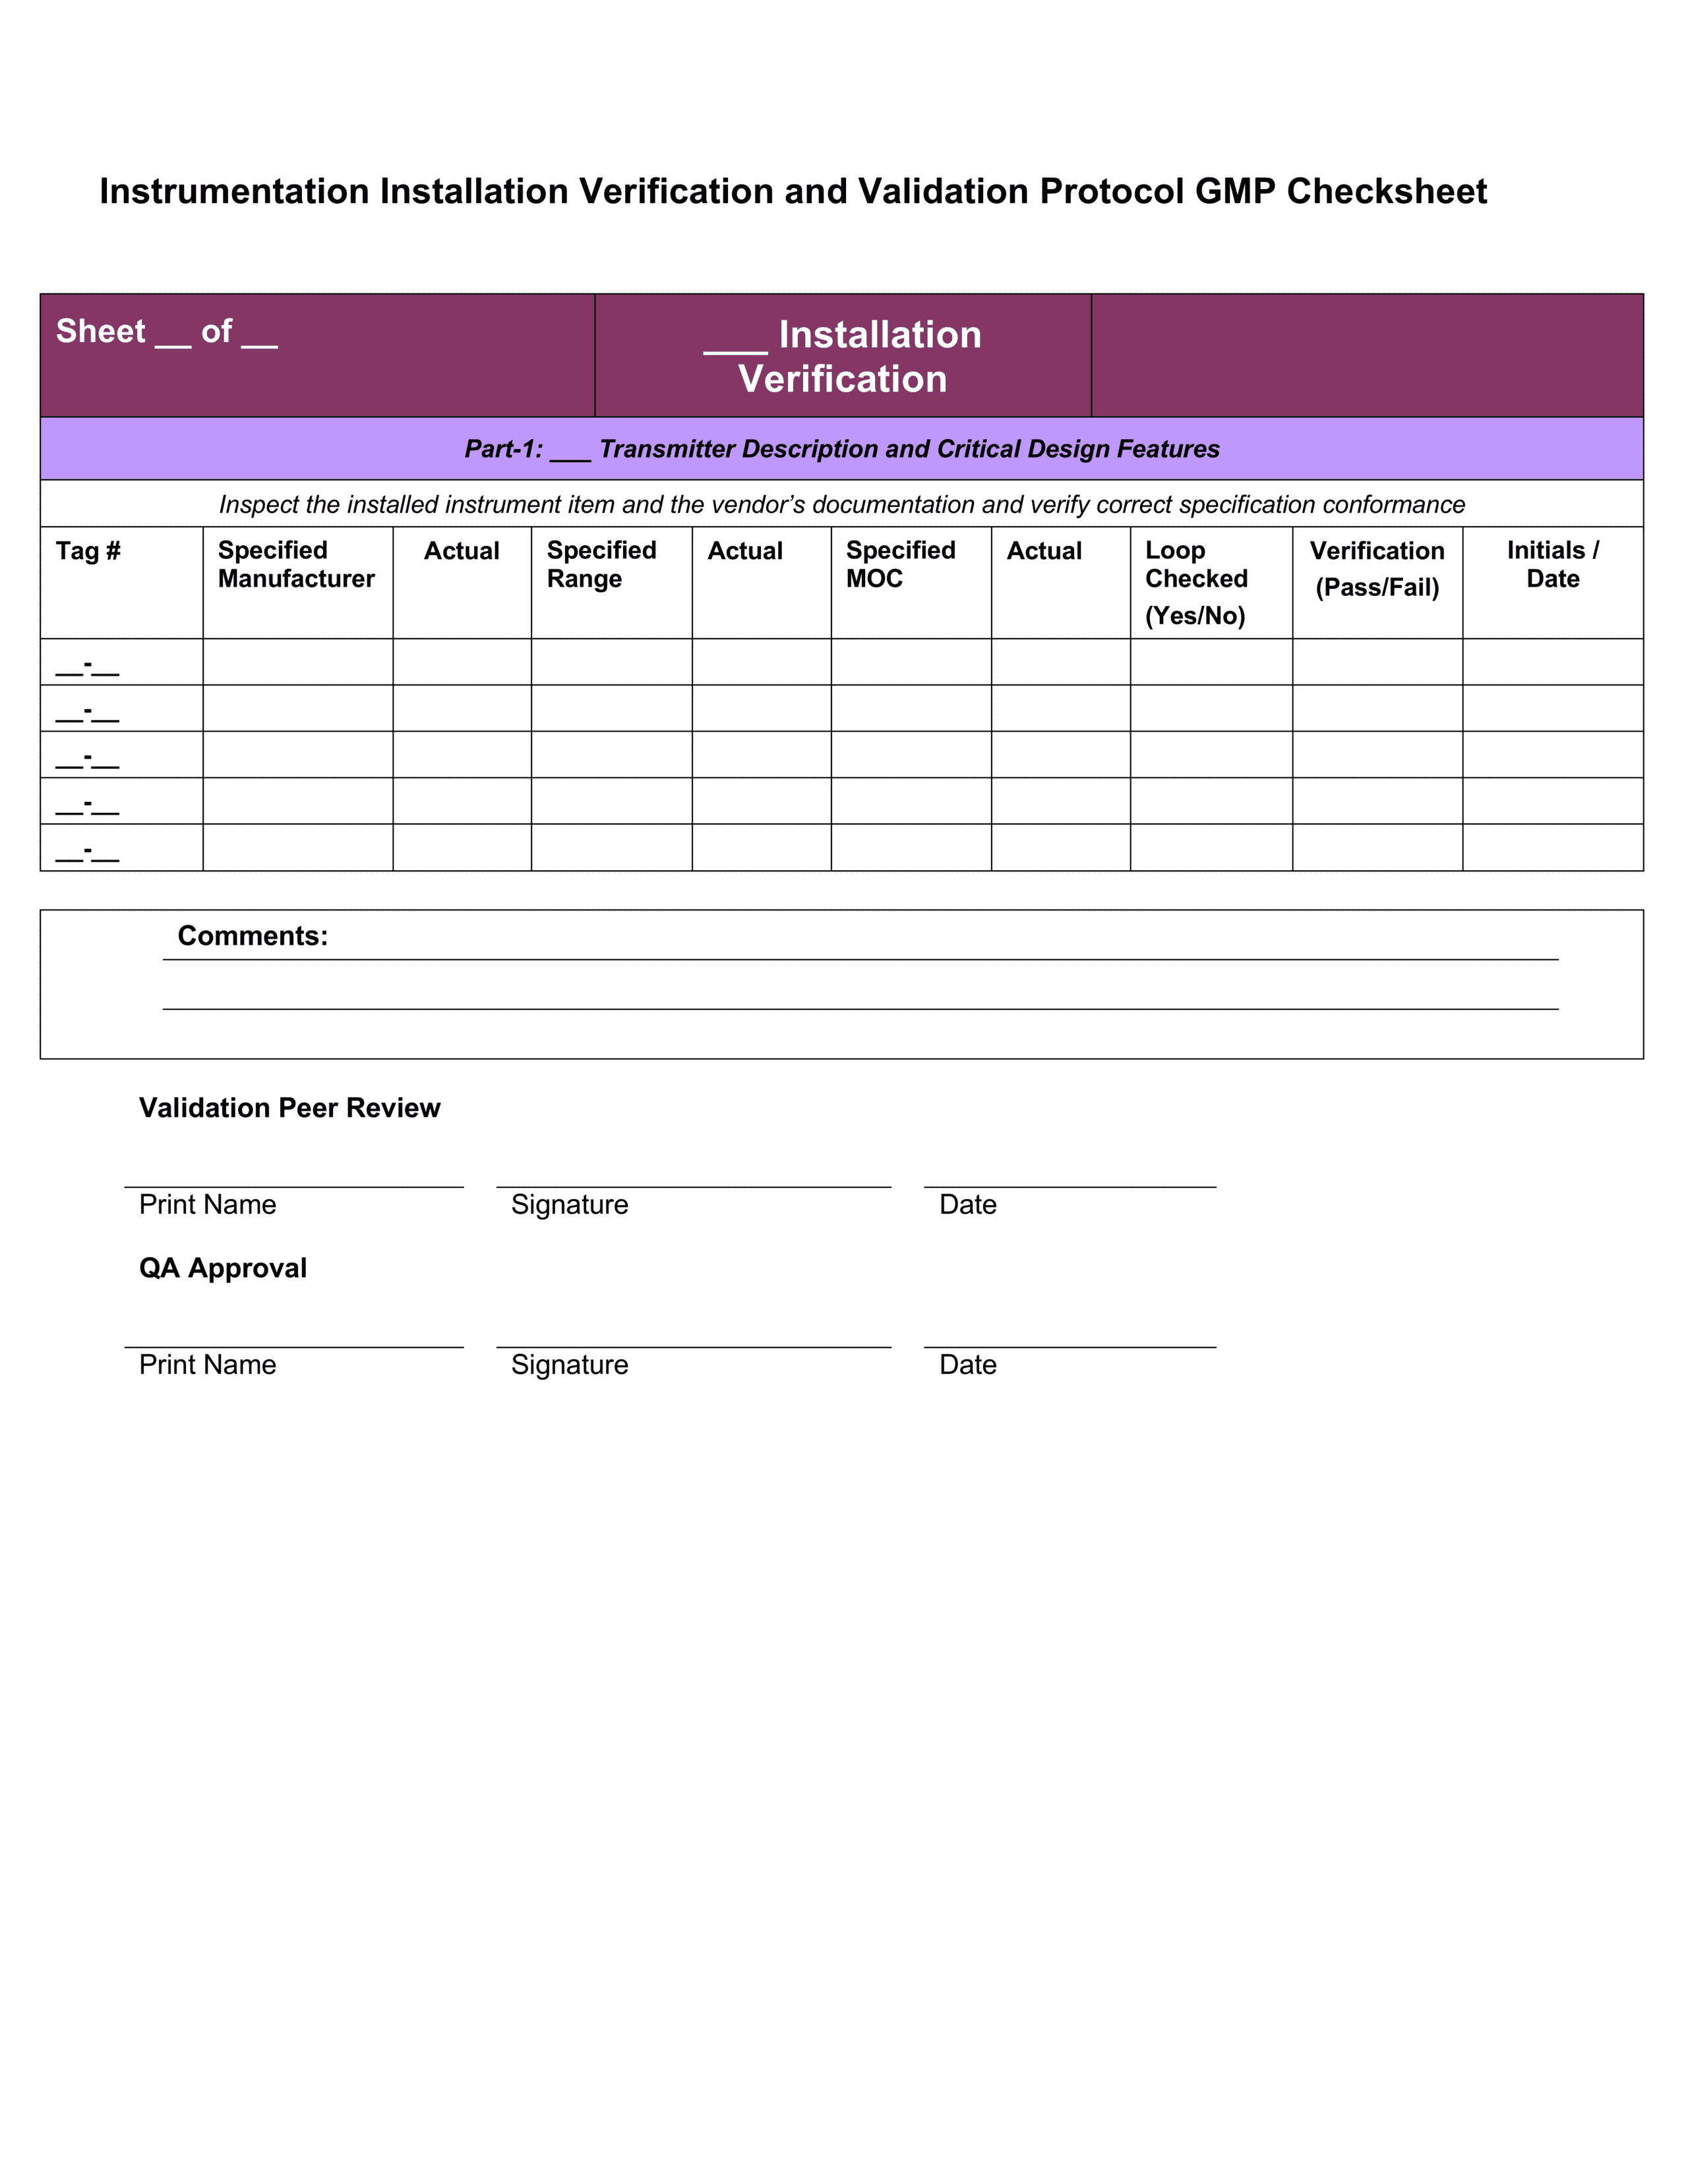
- Prepare installation verification check sheets for necessary instrument items. Make sure to read and confirm that the “Instrument Installation Verification” check sheets cover all the intent and procedures outlined in the “Instrument Installation Verification Testing Procedure”
- Prepare these instrument installation verification check sheet sequences; remember to pre-populate details, where available, for Manufacturer, Calibrated Range and MOC on Part-1 of the checksheet sequence.
- You would then go out and check the details of each instrument in person
You should only be validating the equipment that you have decided is operationally critical components and so if the items you complete checksheets for, are not the items in your summary table, an FDA auditor is going to have questions.
How this would “look” in the real world:
This is one of the first jobs you will do after you join a Validation Team.
There is an installation verification testing procedure in Section 13 of the protocol, which reminds you of
- Description of Test
- Linkage to Requirements Challenged
- Acceptance Criteria
- Prerequisites and/or Assumptions
- Test Method
- Expected Results and Actual Results
This testing procedure will already have been written by the lead Validation Engineer so when you start your career, your main job will be to read and understand what has to be carried out, then carry out the tests according to the method described and record the results in the appropriate checksheets.
If you find any deviations, make sure to follow your company’s deviation procedure and complete the relevant checksheet for deviations.
19 – Piping Installation Verification and Validation Protocol GMP Checksheet
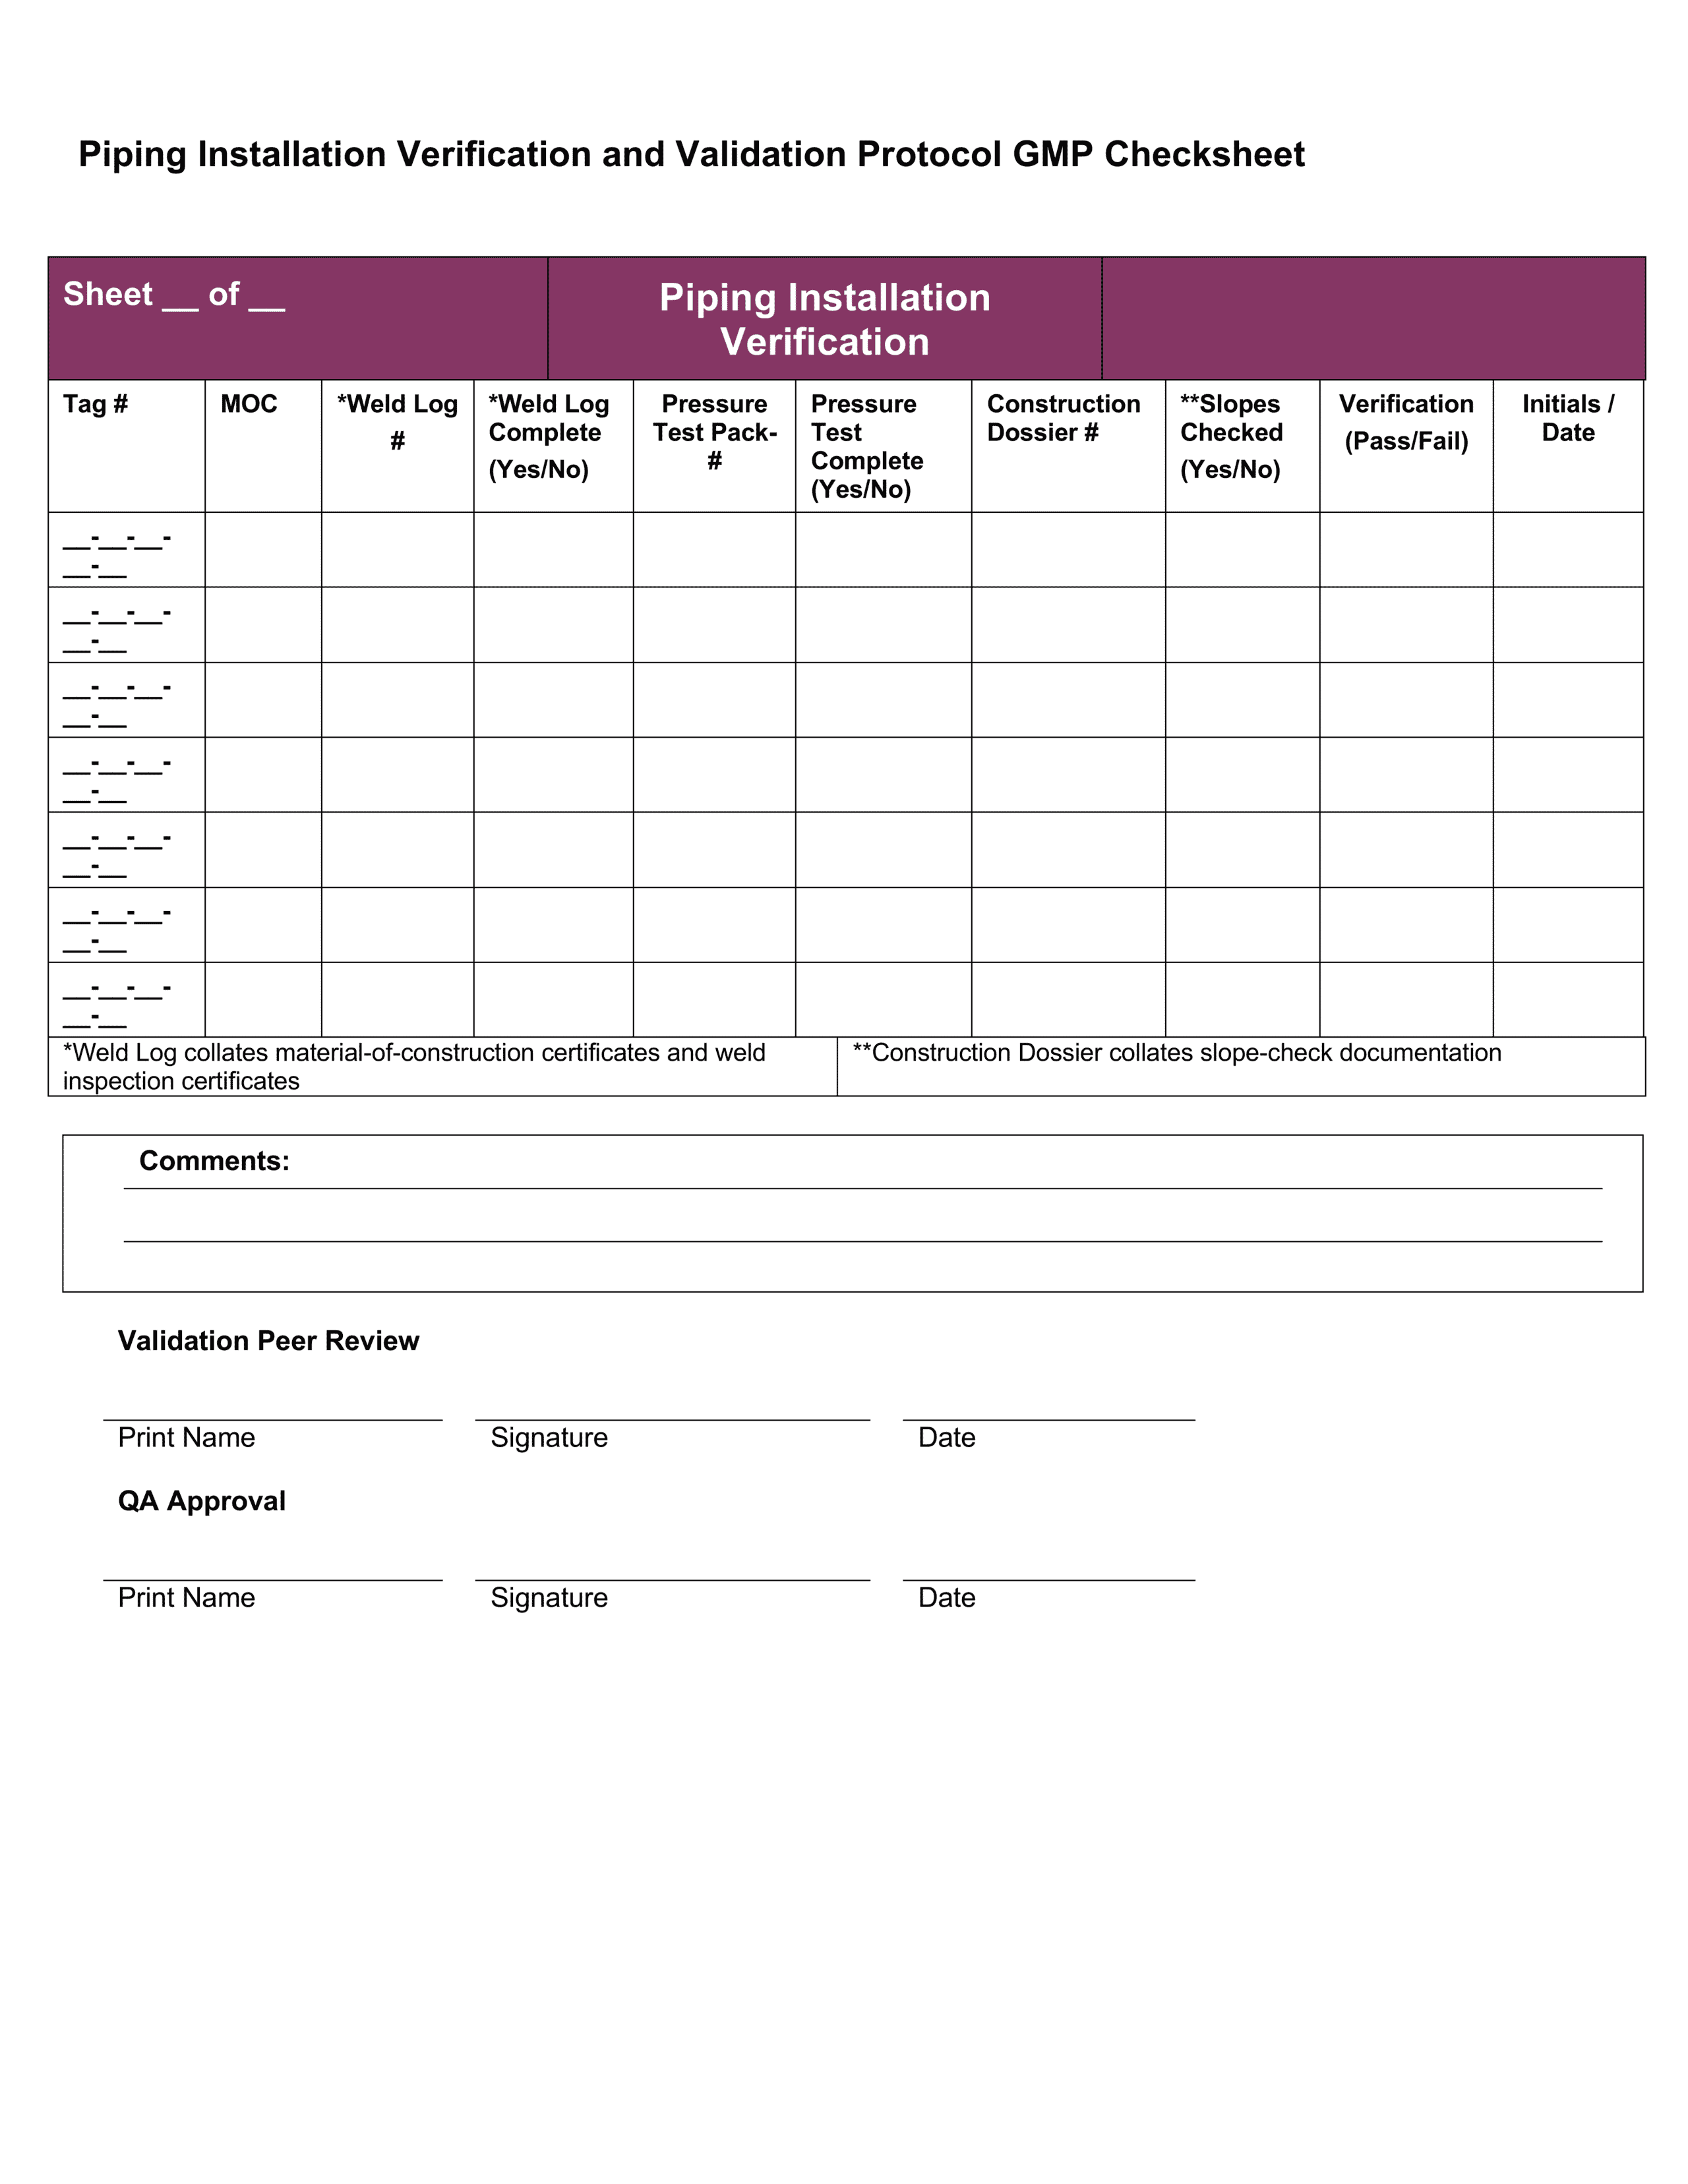
Complete the piping installation verification checksheets.
- Make sure to read and confirm that the “Piping Installation Verification” check sheets cover all the intent and procedures outlined in the “Piping Installation Verification Testing Procedure”.
- Prepare installation verification check sheets for the individual pipes and note the inline component item numbers and descriptions associated with each line in the ‘Comments’ box at the bottom of the sheet. Pre-populate the relevant piping installation verification check sheet sequence with the Tag # and material-of-construction (MOC) details.
- Locate each piece of piping on-site and complete the Piping Installation Verification check sheets for the instrument items in the field.
How this would “look” in the real world:
This is one of the first jobs you will do after you join a Validation Team.
There is an installation verification testing procedure in Section 11.4 of the protocol, which reminds you of
Description of Test
Linkage to Requirements Challenged
Acceptance Criteria
Prerequisites and/or Assumptions
Test Method
Expected Results and Actual Results
This testing procedure will already have been written by the lead Validation Engineer so when you start your career, your main job will be to read and understand what has to be carried out, then carry out the tests according to the method described and record the results in the appropriate checksheets.
If you find any deviations, make sure to follow your company’s deviation procedure and complete the relevant checksheet for deviations.
20 – Traceability Matrix

A Traceability Matrix is a tool used to ensure that all requirements defined within the User Requirement Specifications (URS) are tested in the test protocols. The traceability matrix is a tool both for the validation team (to ensure that requirements are not lost during the validation project) and for auditors (to review the validation documentation).
How this would “look” in the real world:
The purpose of a traceability matrix is to help plan and track the testing programme. When you begin in a Validation Team, you are not going to be expected to complete this. However, this will become more and more important as you gain seniority in the team.
This would be a “live” part of the protocol when test strategies are just being developed – it is a very straightforward way of tracking the different tests you want to perform on the system.
6 Things to Keep in Mind when Writting a Validation Protocol
- In a real world setting, especially at the beginning of a pharmaceutical validation career, you’ll be working within a larger team to complete validation activities.
- Different companies use different templates, different titles, and have their own processes for conducting validation activities. The purpose of this example isn’t to show you an exhaustive account of running a validation procedure, it’s to show you how completed documentation is built up in a systematic way, making sure you understand the processes at each stage.
- As a Validation Team Member, your most important skills are your soft skills. Technical skills can be taught – soft skills are instinctive and are what will set you apart at the end of the day. A Validation Team Member has good written communication skills, self motivation, problem solving skills, organisation skills, IT skills, and great attention to detail.
- You’ll notice when you start the protocol, that there are two parts to it. There is the written section at the front, and the checksheets in the back (the appendices). The front section where there are summary descriptions that describe what is written on the checksheets. An auditor will always read the front of the protocol first and only turn to the appendices when they have a question or see a problem with the information provided. This means it is really important that what is in both parts match and the summaries you write in the front are representative of the results on the checksheets in the appendices.
- While you are completing this protocol, you will notice that all the sections are interlinked. No one section sits in isolation from the others. Each section builds on what has been written before or what will be written later in the protocol.
- You will also notice that you don’t complete it in page order. Instead you will be moving around the protocol a bit. Most of the protocol is completed in the order in which it is laid out, however, every now and again you will need to go to an appendix to get information or complete a task before going back to an earlier section. This is the way protocols will be laid out in the field as they are written for a person or an auditor who is coming with no knowledge of the system to be able to understand what was carried out to deem a system fit-for-intended-use.
You might also be interested in reading:
- What is pharmaceutical validation?
- What is process validation?
- What is IQ OQ PQ?
- What is computer system validation or CSV?
- The 8 most “in demand” skills for validation professionals
About the Author

Gerry Creaner
President
Senior Lecturer with GetReskilled
Gerry Creaner has over 40-years of experience in the Life Sciences Manufacturing industry across a range of technical, managerial and business roles. He established a very successful engineering consultancy prior to founding GetReskilled, an online education and learning business, with offices in Singapore, Ireland and Boston (USA), focussed on the manufacture of safe and effective medicines for the public.
He is also a founding Director of two Singapore based philanthropic organizations, the Farmleigh Fellowship and the Singapore-Ireland Fund, both of which deepen the well established and historical Singapore – Ireland relationship and deliver long-term benefits to both countries.
Gerry has an undergraduate degree in Chemical Engineering (UCD, 1980) and an MSc (Management) from Trinity College Dublin (2003) and is currently doing research for his Ph.D.

Donagh Fitzgerald
Head of Marketing & Product Development
Mechanical/Production Engineer
Donagh looks after the marketing and product development including the training and pedagogical elements of our programs and makes sure that all GetReskilled’s users can have a great online learning experience. Donagh has lived and worked in many countries including Ireland, America, the UK, Singapore, Hong Kong and Japan. Donagh has also served as the Program Manager for the Farmleigh Fellowship based out of Singapore.
Donagh holds Degrees in Production Engineering and Mechanical Engineering from South East Technological University, Ireland.